From our previous post in our [Home Setup] series, we deployed Traefik Reverse Proxy on Docker Swarm.
As I have a Dynamic Public IP Address, we need some way to route connections on our DNS name (*.pistack.co.za in my case) to the Public IP where our stacks are hosted.
I host my domain on Cloudflare, and they have an API to update your DNS records. So we will use a docker container to update our Public address as soon as it changed.
I found a great docker image: oznu/cloudflare-ddns that will achieve that task for us.
At the bottom of this post, I will have the instructions available if you want to deploy this on Kubernetes.
Create a Cloudflare Account
Once you have created a account, create a "new site" and select the "free" plan:

Once you select your domain, you should be seeing something like this:

Select "DNS" and add a entry:
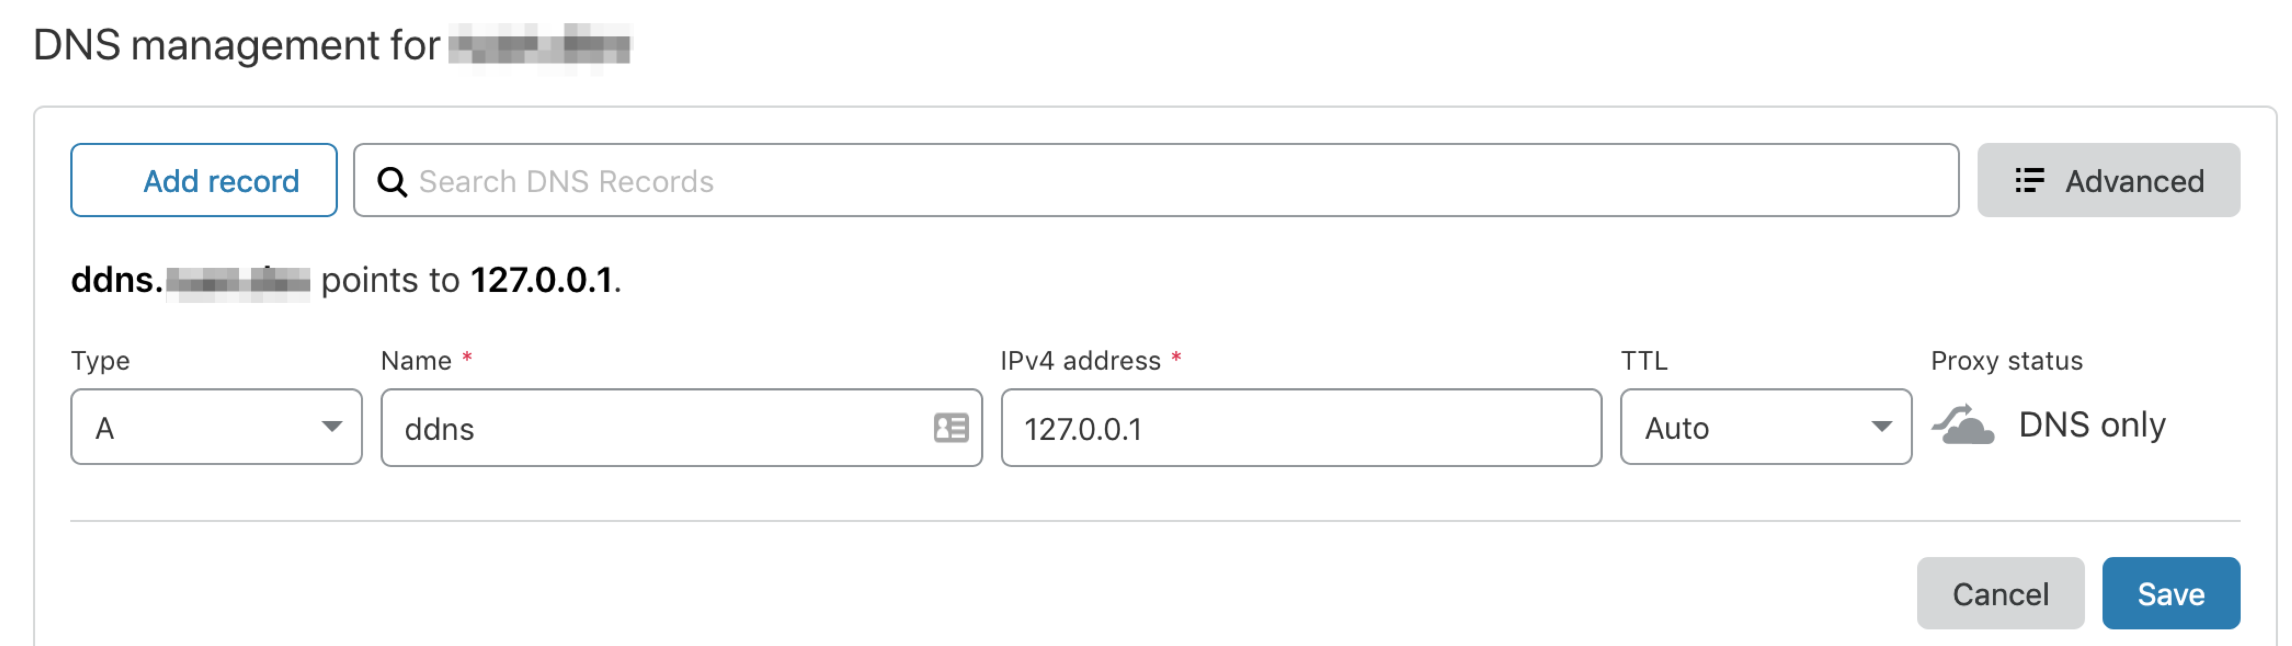
I will be creating a A Record with the hostname ddns and just give it the target of 127.0.0.1 as it will be changed later. And also make sure to change the "Proxy status" to "DNS only"
Then create another record, this time a CNAME Record with the hostname * with the target of ddns.yourdomain.com and make sure the target is set to your domain.

This will allow us to hook up services to DNS names on the fly without having to change DNS names.
So you can create services such as Wordpress and Grafana with the hostnames wordpress.mydomain.com and grafana.mydomain.com, they will be configured on Traefik and once you make a HTTP request` the DNS will resolve the query to the Public IP address and once it hits Traefik it will know where to route the connection to.
Create a Cloudflare API Key
To create a API Key, select your profile at the top right corner, select "My Profile", then select "API Tokens" and at the bottom you can access your API Keys:

Deploy the Docker Container
As our current setup is based on Docker Swarm, which you can follow this post on how to provision a swarm.
We will be creating a docker compose file with our service definition and deploy the service to our swarm.
Our docker-compose.yml:
version: "3.4"
services:
  ddns:
    image: oznu/cloudflare-ddns:armhf
    environment:
      - [email protected]
      - API_KEY=your-api-key
      - ZONE=yourdomain.com
      - SUBDOMAIN=ddns
      - PROXIED=false
      - RRTYPE=A
      - DELETE_ON_STOP=false
Just make sure to populate your values into the environment fields.
Then deploy the stack:
$ docker stack deploy -c docker-compose.yml cloudflare
Once the service is running you can tail the logs to see if the DNS entry was updated, in my case:
$ docker service logs -f cloudflare_ddns
Zone: x.x (x)
cloudflare_ddns.1.nrwyokg7fw66@rpi-01    | DNS Record: ddns.x.x (x)
cloudflare_ddns.1.nrwyokg7fw66@rpi-01    | [cont-init.d] 30-cloudflare-setup: exited 0.
cloudflare_ddns.1.nrwyokg7fw66@rpi-01    | [cont-init.d] 50-ddns: executing...
cloudflare_ddns.1.nrwyokg7fw66@rpi-01    | Updating CloudFlare DNS record ddns.x.x from 127.0.0.1 to 155.x.x.x ...
cloudflare_ddns.1.nrwyokg7fw66@rpi-01    | CloudFlare DNS record ddns.x.x (155.x.x.x) updated successfully.
Now whenever your Public IP changes, your docker service will take care of your DNS changes.
Optional: Deploy on Kubernetes
If you want to deploy the Cloudflare DDNS Client on Kubernetes:
---
apiVersion: v1
kind: ConfigMap
metadata:
  name: cloudflare-ddns-env
data:
  API_KEY: your-api-key
  DELETE_ON_STOP: "false"
  EMAIL: [email protected]
  PROXIED: "false"
  RRTYPE: A
  ZONE: yourdomain.com
---
kind: Deployment
apiVersion: apps/v1
metadata:
  name: cloudflare-ddns
  namespace: default
  labels:
    app: cloudflare-ddns
    category: tools
spec:
  replicas: 1
  selector:
    matchLabels:
      app: cloudflare-ddns
      category: tools
  template:
    metadata:
      labels:
        app: cloudflare-ddns
        category: tools
    spec:
      containers:
      - name: cloudflare-ddns
        image: oznu/cloudflare-ddns:armhf
        envFrom:
        - configMapRef:
            name: cloudflare-ddns-env
        resources:
          requests:
            cpu: 100m
            memory: 50Mi
          limits:
            cpu: 100m
            memory: 50Mi
Then deploy:
$ kubectl apply -f deployment.yml